何故かブラウザからの再起動だと駄目。acアダプタ抜き差しする必要がある。
2017年12月25日月曜日
2017年12月19日火曜日
【ESXi】【NUC】【PX-W3U4】仮想マシンでTVチューナー使用【失敗】
◆環境
・VM:ESXi6.5(従って試聴はリモートデスクトップ経由となる)
・ゲストOS:Windows10x64
◆前提条件
・ESXiがインストール済みであること。
・ゲストOSとしてwindows10がインストール済みであること。
◆その他
多分、USB3.0コントローラーとPX-W3U4の相性が悪く不定期にブルースクリーンになる。Windows10のUSBコントローラードライバーも関係あるかも。Windows7+Intel公式ドライバーでも、駄目だった。NUC+PX-W3U4の組み合わせは駄目そう。
◆機材
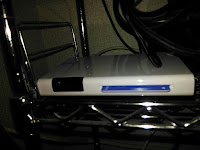
・PX-W3U4
・B-CASカード(別売り)
◆使用ツール
・tvtest0.7.23 x86版
・tvrock09t8a
◆参考サイト
https://sites.google.com/site/tsnukituner/tstunerlist/plex/px-w3u4
◆インストール手順
1. ESXiパススルー設定
下記のリンクを参照。
【ESXi】【NUC】ESXi6.5 USB3(PCIPassThrough)
2. ドライバーインストール
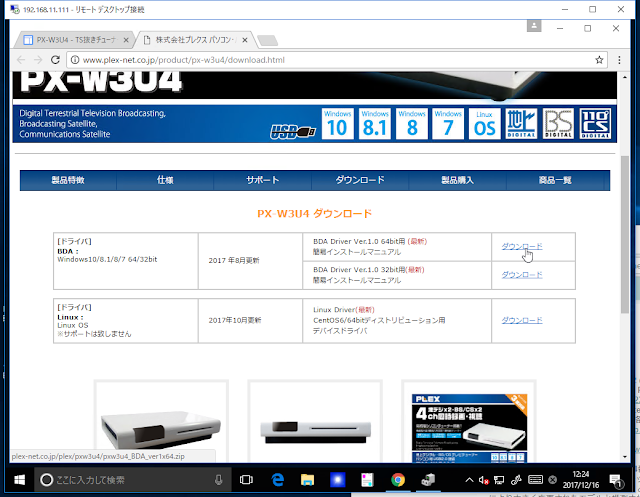
2.1. 公式からドライバーダウンロード
1) OSがWindows10x64のため、ドライバーもx64版をダウンロード。
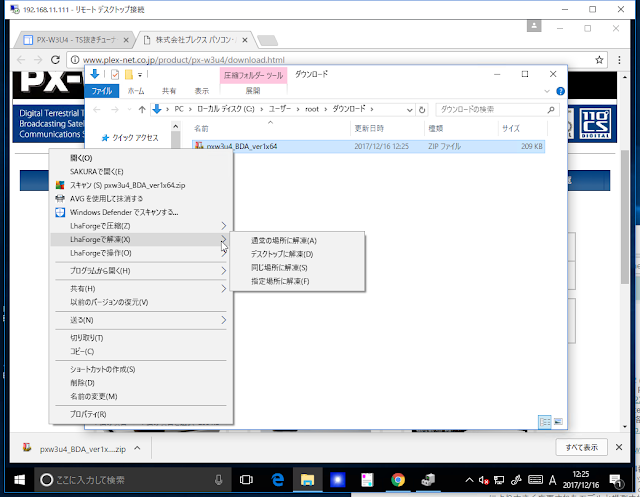
2) ダウンロードしたファイルを解凍。(下記は、LhaForgeを使用しているが、Windows標準の解凍でOK)
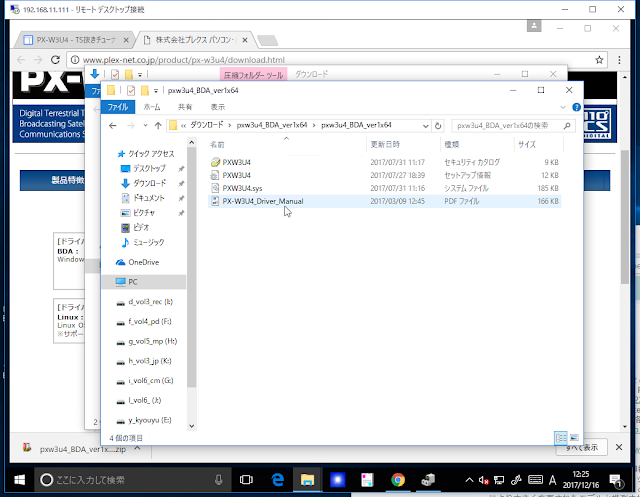
3) 解凍したファイル。(後で使用)
2.2. ドライバインストール
1) Winキー+X、Mの順に押下(Win10の場合)し、デバイスマネージャー起動。
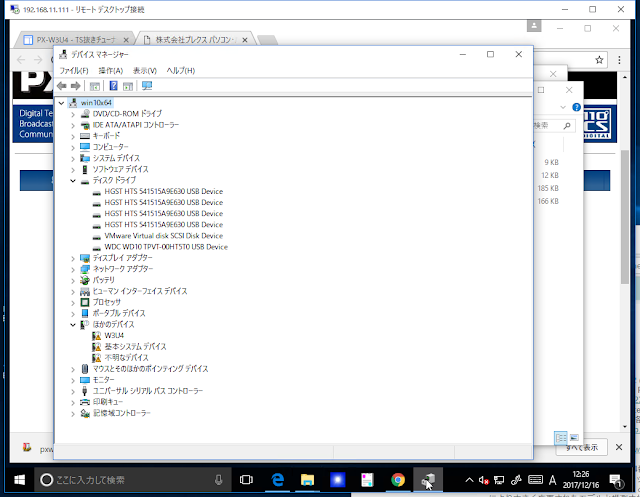
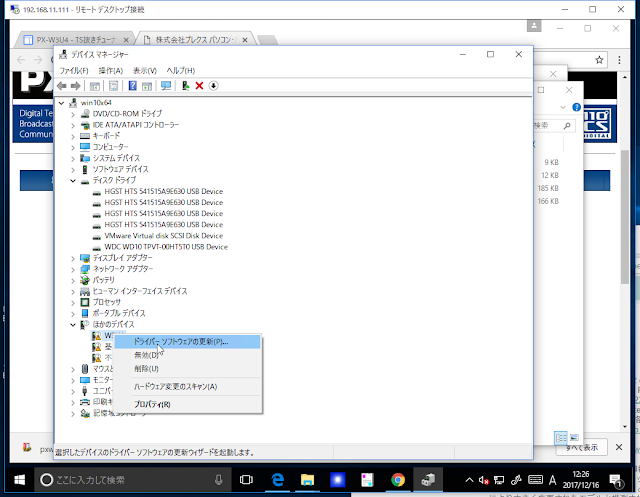
2) 「W3U4」を選択し、右クリックし、「ドライバーソフトウェア」の更新を選択。
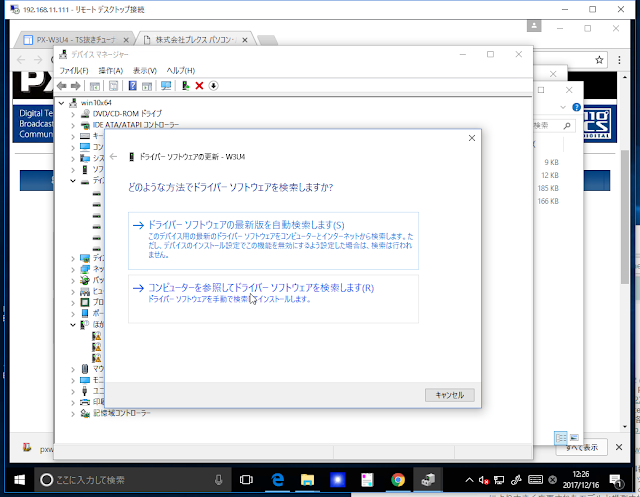
3) 「コンピューターを参照してドライバーソフトウェアを検索します」を選択。
4) 手順2.1.で解凍したフォルダを指定
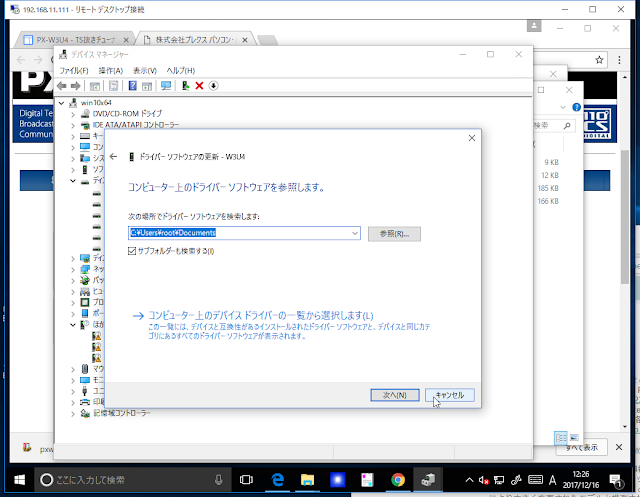
5) しばらく待つ。
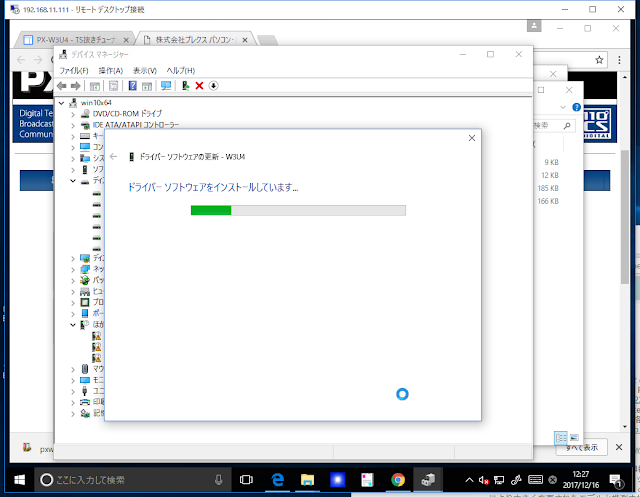
6) "~を常に信頼する"チェックボックスをチェックして、「インストール」ボタン押下。
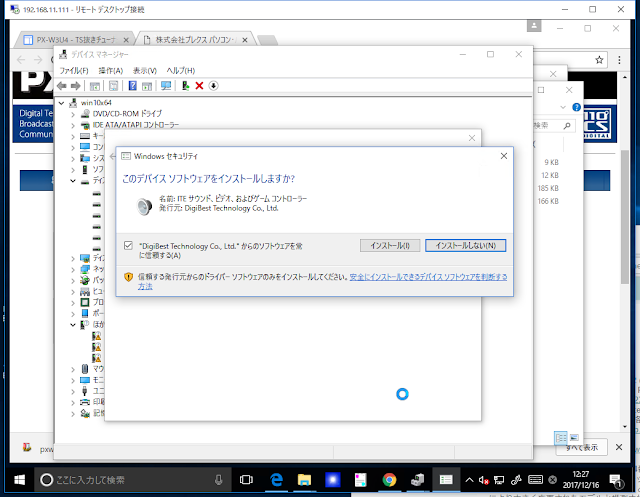
7) 「閉じる」ボタン押下。
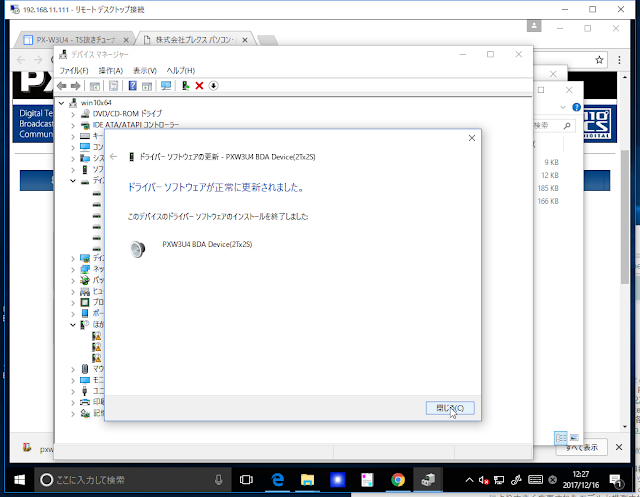
※何故かVisual C++ 20XX 再頒布可能パッケージはインストールしなくても動作した。他のソフトのインストールの際にインストール済みだったのかな?動作しない場合は、適宜インストールすること。
3. フィルタインストール
3.1. ダウンロード
フィルタダウンロード
3.2. ダウンロードしたファイルの解凍(下記は解凍後)
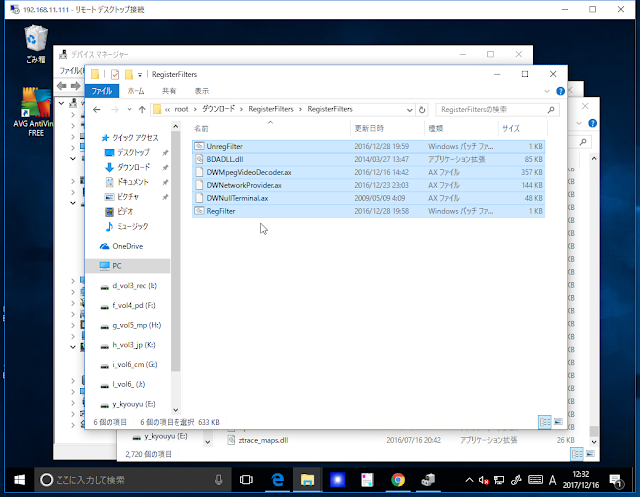
3.2. フィルタインストール
1) Winキー押下、【cmd】を入力し、「コマンドプロンプト」を右クリックし、「管理者として実行」を選択。
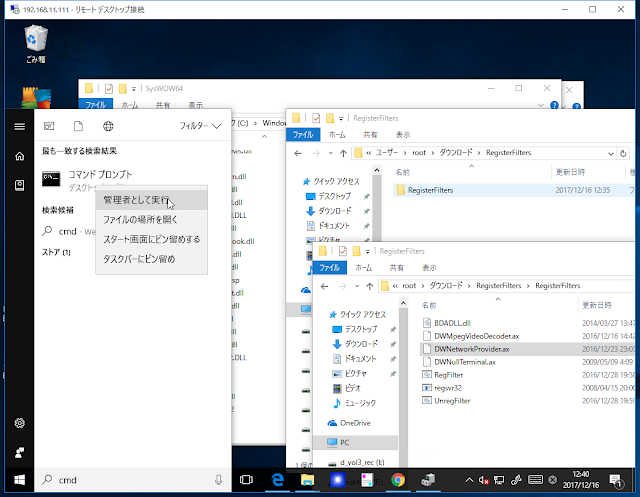
2) 「はい」を押下。
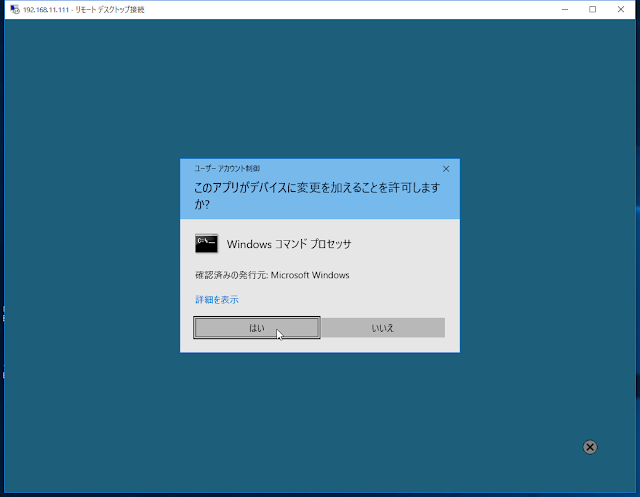
3) cdコマンドでフィルタのディレクトリへ移動。(パスは適宜読み替えること。)
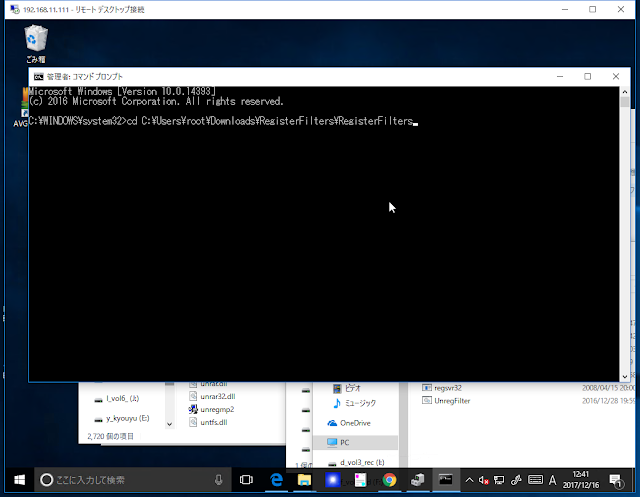
4) 「RegFilter.bat」を入力し、Enterキー押下。(下記は実行後のポップアップウィンドウが表示されている。OK⇒ポップアップ⇒OK⇒・・・。)
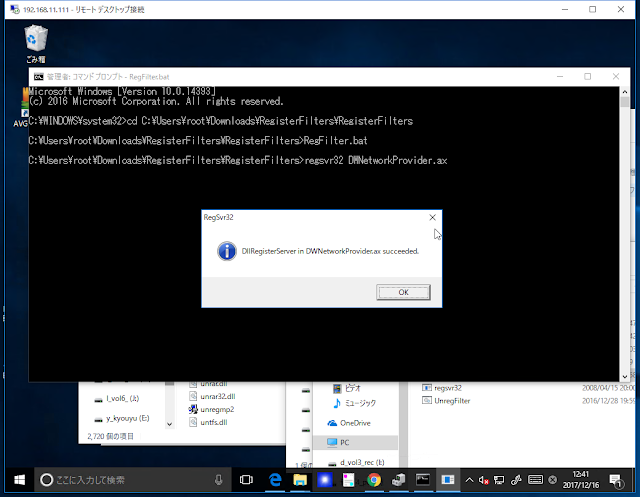
3. tvtestインストール
3.1. 32bit版をダウンロード&解凍
ローカルにあったので、それを使用。googleで検索すれば、出てくるはず。
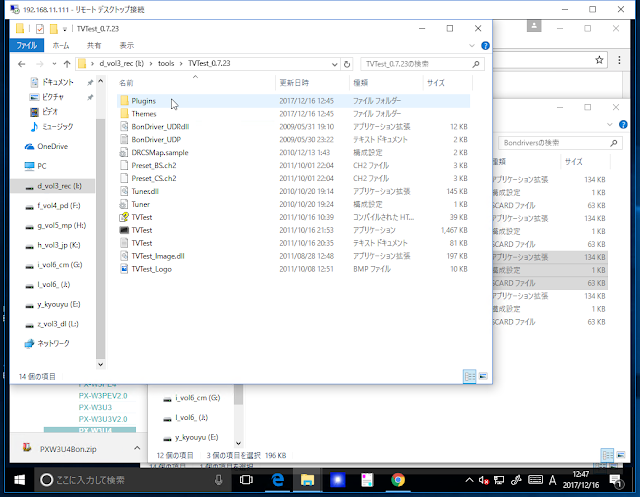
3.2. BonDriverダウンロード&解凍
下記からダウンロード
BonDriver
3.4. TvTest起動し、下記のように入力。
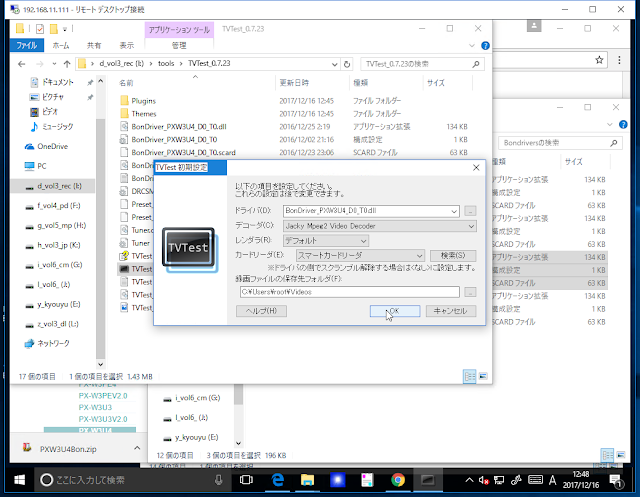
3.4. チャネルスキャン実行
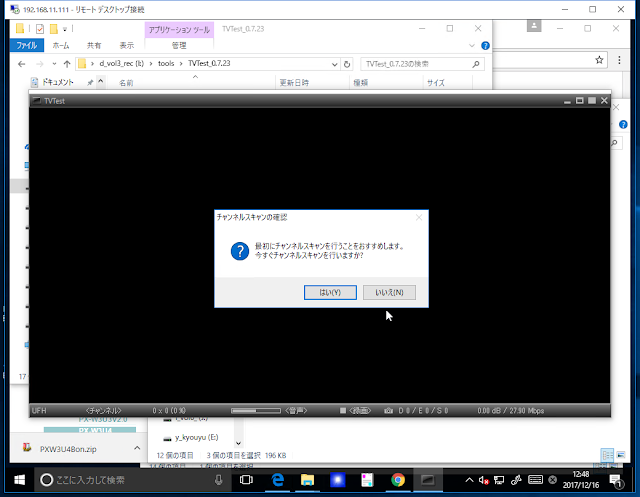
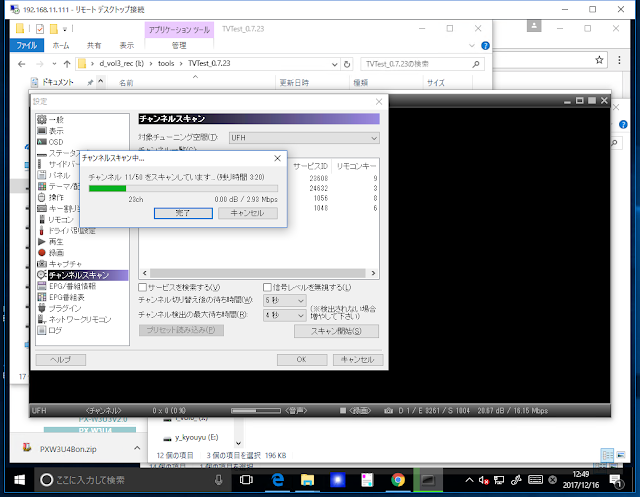
3.5. しばらく待つと、視聴が始まる。

-------------------以下、今後記載予定-------------------
4.tvrock
4.1. ダウンロード
4.2. tvtest連携ファイル配置
連携ファイル x32版を使用(マニュアルに記載有り。)
4.2. dtune.bat実行
4.3. 設定
◆USBについて
USB2.0接続になる。試聴しないので特に問題無し。
◆視聴画質調査予定
リモートデスクトップ接続のためか、コーデックのせいなのかコーミングノイズが発生する。tvtestの設定で修正できるかな?
◆録画画質調査予定
・VM:ESXi6.5(従って試聴はリモートデスクトップ経由となる)
・ゲストOS:Windows10x64
◆前提条件
・ESXiがインストール済みであること。
・ゲストOSとしてwindows10がインストール済みであること。
◆その他
多分、USB3.0コントローラーとPX-W3U4の相性が悪く不定期にブルースクリーンになる。Windows10のUSBコントローラードライバーも関係あるかも。Windows7+Intel公式ドライバーでも、駄目だった。NUC+PX-W3U4の組み合わせは駄目そう。
・PX-W3U4
・B-CASカード(別売り)

◆使用ツール
・tvtest0.7.23 x86版
・tvrock09t8a
◆参考サイト
https://sites.google.com/site/tsnukituner/tstunerlist/plex/px-w3u4
◆インストール手順
1. ESXiパススルー設定
下記のリンクを参照。
【ESXi】【NUC】ESXi6.5 USB3(PCIPassThrough)
2. ドライバーインストール
2.1. 公式からドライバーダウンロード
1) OSがWindows10x64のため、ドライバーもx64版をダウンロード。

2) ダウンロードしたファイルを解凍。(下記は、LhaForgeを使用しているが、Windows標準の解凍でOK)

3) 解凍したファイル。(後で使用)

2.2. ドライバインストール
1) Winキー+X、Mの順に押下(Win10の場合)し、デバイスマネージャー起動。

2) 「W3U4」を選択し、右クリックし、「ドライバーソフトウェア」の更新を選択。

3) 「コンピューターを参照してドライバーソフトウェアを検索します」を選択。

4) 手順2.1.で解凍したフォルダを指定

5) しばらく待つ。

6) "~を常に信頼する"チェックボックスをチェックして、「インストール」ボタン押下。

7) 「閉じる」ボタン押下。

※何故かVisual C++ 20XX 再頒布可能パッケージはインストールしなくても動作した。他のソフトのインストールの際にインストール済みだったのかな?動作しない場合は、適宜インストールすること。
3. フィルタインストール
3.1. ダウンロード
フィルタダウンロード
3.2. ダウンロードしたファイルの解凍(下記は解凍後)

3.2. フィルタインストール
1) Winキー押下、【cmd】を入力し、「コマンドプロンプト」を右クリックし、「管理者として実行」を選択。

2) 「はい」を押下。

3) cdコマンドでフィルタのディレクトリへ移動。(パスは適宜読み替えること。)

4) 「RegFilter.bat」を入力し、Enterキー押下。(下記は実行後のポップアップウィンドウが表示されている。OK⇒ポップアップ⇒OK⇒・・・。)

3. tvtestインストール
3.1. 32bit版をダウンロード&解凍
ローカルにあったので、それを使用。googleで検索すれば、出てくるはず。

3.2. BonDriverダウンロード&解凍
下記からダウンロード
BonDriver
3.3. TvTestの直下にBonDriverをコピー(下記はT0のみだが、Wチューナー使用する場合はT1もコピー、また、BSの場合も同様。)
3.4. TvTest起動し、下記のように入力。

3.4. チャネルスキャン実行


3.5. しばらく待つと、視聴が始まる。

-------------------以下、今後記載予定-------------------
4.tvrock
4.1. ダウンロード
4.2. tvtest連携ファイル配置
連携ファイル x32版を使用(マニュアルに記載有り。)
4.2. dtune.bat実行
4.3. 設定
◆USBについて
USB2.0接続になる。試聴しないので特に問題無し。
◆視聴画質調査予定
リモートデスクトップ接続のためか、コーデックのせいなのかコーミングノイズが発生する。tvtestの設定で修正できるかな?
◆録画画質調査予定
2017年10月25日水曜日
【Java】try with resourcesのカバレッジ
◆EclEmmaでどうしても通せないルートがある。
各サイトが説明しているようにカバレッジに拘る必要はないのだが、
テスト漏れを即検出したいので、できれば100%にしたい。
しかし、下記のようにtry-with-resources 文など一部のコードがEclEmmaで全ルートパスできない。
ツールチップを表示すると7ルートミス。
Jmockit(下記コード参照)で1まで行くのだが、あと1ルートがパスできない。
◆テスト対象
◆テストコード
◆Maven(pom.xml)
◆環境
各サイトが説明しているようにカバレッジに拘る必要はないのだが、
テスト漏れを即検出したいので、できれば100%にしたい。
しかし、下記のようにtry-with-resources 文など一部のコードがEclEmmaで全ルートパスできない。
ツールチップを表示すると7ルートミス。
Jmockit(下記コード参照)で1まで行くのだが、あと1ルートがパスできない。
◆テスト対象
package sampl.junitsample;

import java.io.IOException;
import java.io.OutputStream;
import java.net.HttpURLConnection;
import java.net.URL;

public class App {
 public static void main(String[] args) throws IOException {
  HttpURLConnection conn = (HttpURLConnection) new URL("http://localhost").openConnection();
  conn.setDoOutput(true);

  try (OutputStream st = conn.getOutputStream()) {
   st.write("abc".getBytes());
  }
 }
}
◆テストコード
package sampl.junitsample;

import java.io.ByteArrayOutputStream;
import java.io.IOException;
import java.io.OutputStream;

import org.junit.Test;

import mockit.Mock;
import mockit.MockUp;

public class AppTest {
 @Test
 public void testApp1() throws IOException {
  App.main(null);
 }

 @Test
 public void testApp2() throws IOException {
  new MockUp<sun.net.www.protocol.http.HttpURLConnection>() { // 何故かsun.~
   @Mock
   public OutputStream getOutputStream() throws IOException {
    throw new IOException("mock exception.");
   }
  };
  try {
   App.main(null);
  } catch (Exception e) {
   e.printStackTrace();
  }
 }

 @Test
 public void testApp3() throws IOException {
  new MockUp<java.io.ByteArrayOutputStream>() { // デバッガで実際の型を調べるとPosterOutputStream
   @Mock
   public void write(byte[] b) throws IOException {
    throw new IOException("mock exception.");
   }
  };
  try {
   App.main(null);
  } catch (Exception e) {
   e.printStackTrace();
  }
 }

 @Test
 public void testApp5() throws IOException {
  new MockUp<ByteArrayOutputStream>() { // デバッガで実際の型を調べるとPosterOutputStream
   @Mock
   public void write(byte[] b) throws IOException {
    throw new IOException("mock exception.");
   }

   @Mock
   public void close() throws IOException {
    throw new IOException("mock exception.");
   }
  };

  try {
   App.main(null);
  } catch (Exception e) {
   e.printStackTrace();
  }
 }

 @Test
 public void testApp6() throws IOException {
  new MockUp<sun.net.www.protocol.http.HttpURLConnection>() { // 何故かsun.~
   @Mock
   public OutputStream getOutputStream() throws IOException {
    return null;
   }
  };
  new MockUp<ByteArrayOutputStream>() {
   @Mock
   public void write(byte[] b) throws IOException {
    return;
   }

   @Mock
   public void close() throws IOException {
    throw new IOException("mock exception.");
   }
  };

  try {
   App.main(null);
  } catch (Exception e) {
   e.printStackTrace();
  }
 }
}
<project xmlns="http://maven.apache.org/POM/4.0.0" xmlns:xsi="http://www.w3.org/2001/XMLSchema-instance"
 xsi:schemaLocation="http://maven.apache.org/POM/4.0.0 http://maven.apache.org/xsd/maven-4.0.0.xsd">
 <modelVersion>4.0.0</modelVersion>

 <groupId>sampl</groupId>
 <artifactId>junitsample</artifactId>
 <version>0.0.1-SNAPSHOT</version>
 <packaging>jar</packaging>

 <name>junitsample</name>
 <url>http://maven.apache.org</url>

 <properties>
  <project.build.sourceEncoding>UTF-8</project.build.sourceEncoding>
 </properties>

 <dependencies>
  <!-- https://mvnrepository.com/artifact/junit/junit -->
  <dependency>
   <groupId>junit</groupId>
   <artifactId>junit</artifactId>
   <version>4.4</version>
   <scope>test</scope>
  </dependency>
  <!-- https://mvnrepository.com/artifact/org.jmockit/jmockit -->
  <dependency>
   <groupId>org.jmockit</groupId>
   <artifactId>jmockit</artifactId>
   <version>1.35</version>
   <scope>test</scope>
  </dependency>
 </dependencies>

</project>
- Eclipse:4.7(pleiades)
- EclEmma:3.0.0.201706140232
2017年8月21日月曜日
【Java】File Downloadその3(commons-io)
String str = IOUtils.toString(new URL(targetUrl), Charset.defaultCharset());
FileUtils.writeStringToFile(new File(filePath), str, Charset.defaultCharset());
ファイル保存される。ちょっとしたものは上記で良いが、apache httpclientを推奨。apache httpclientはアクセス先がページ移動(301)したとき等に自動で移動してくれる。
◆ソースコード
package sample.httpget;

import java.io.File;
import java.io.IOException;
import java.net.URL;
import java.nio.charset.Charset;

import org.apache.commons.io.FileUtils;
import org.apache.commons.io.IOUtils;

public class App {
  public static void main(String[] args) {
    try {
      download("http://google.com/", "/tmp/google.htm", Charset.forName("Shift_JIS"));
    } catch (IOException e) {
      e.printStackTrace();
    }
  }

  public static void download(String targetUrl, String filePath, Charset ch) throws IOException {
    String str = IOUtils.toString(new URL(targetUrl), ch);
    FileUtils.writeStringToFile(new File(filePath), str, Charset.defaultCharset());
  }
}
◆pom.xml
<project xmlns="http://maven.apache.org/POM/4.0.0" xmlns:xsi="http://www.w3.org/2001/XMLSchema-instance"
 xsi:schemaLocation="http://maven.apache.org/POM/4.0.0 http://maven.apache.org/xsd/maven-4.0.0.xsd">
 <modelVersion>4.0.0</modelVersion>

 <groupId>sample</groupId>
 <artifactId>HttpGet</artifactId>
 <version>0.0.1-SNAPSHOT</version>
 <packaging>jar</packaging>

 <name>HttpGet</name>
 <url>http://maven.apache.org</url>

 <properties>
  <project.build.sourceEncoding>UTF-8</project.build.sourceEncoding>
 </properties>

 <dependencies>
  <dependency>
   <groupId>junit</groupId>
   <artifactId>junit</artifactId>
   <version>3.8.1</version>
   <scope>test</scope>
  </dependency>
  <!-- https://mvnrepository.com/artifact/commons-io/commons-io -->
  <dependency>
   <groupId>commons-io</groupId>
   <artifactId>commons-io</artifactId>
   <version>2.5</version>
  </dependency>

 </dependencies>
</project>
2017年8月20日日曜日
【Java】簡易HTTP Post
■3つ程。3番目はcommons-ioが必要。
◆ソースコード
◆pom.xml
◆ソースコード
package sample.httppost;

import java.io.IOException;
import java.io.InputStream;
import java.io.OutputStream;
import java.net.HttpURLConnection;
import java.net.URL;
import java.net.URLConnection;
import java.nio.charset.Charset;

import org.apache.commons.io.IOUtils;

import javafx.util.Pair;

public class App {
  public static void main(String[] args) {
    try {
      sendPost1("http://localhost:8090/", "abc");
      System.out.println(sendPost2("http://localhost:8090/", "abc"));
      System.out.println(sendPost3("http://localhost:8090/", "abc", Charset.defaultCharset()));
    } catch (IOException e) {
      e.printStackTrace();
    }
  }

  public static void sendPost1(String targetUrl, String sendStr) throws IOException {
    URLConnection conn = new URL(targetUrl).openConnection();
    conn.setDoOutput(true);

    try (OutputStream st = conn.getOutputStream()) {
      st.write(sendStr.getBytes());
    }
  }

  public static int sendPost2(String targetUrl, String sendStr) throws IOException {
    HttpURLConnection conn = (HttpURLConnection) new URL(targetUrl).openConnection();
    conn.setDoOutput(true);

    try (OutputStream st = conn.getOutputStream()) {
      st.write(sendStr.getBytes());
    }
    return conn.getResponseCode();
  }


  public static Pair<Integer,String> sendPost3(String targetUrl, String sendStr, Charset chSet) throws IOException {
    HttpURLConnection conn = (HttpURLConnection) new URL(targetUrl).openConnection();
    conn.setDoOutput(true);
    conn.setRequestProperty("Accept-Charset", chSet.name());
    conn.setRequestProperty("Content-Type", "application/x-www-form-urlencoded;charset=" + chSet.name());
    conn.setRequestProperty("User-Agent", "Mozilla/5.0");

    try (OutputStream st = conn.getOutputStream()) {
      st.write(sendStr.getBytes());
    }

    try (InputStream st = conn.getInputStream()) {
      int code = conn.getResponseCode();
      String str = IOUtils.toString(st, chSet);
      return new Pair<Integer, String>(code, str);
    }
  }
}
◆pom.xml
<project xmlns="http://maven.apache.org/POM/4.0.0" xmlns:xsi="http://www.w3.org/2001/XMLSchema-instance"
 xsi:schemaLocation="http://maven.apache.org/POM/4.0.0 http://maven.apache.org/xsd/maven-4.0.0.xsd">
 <modelVersion>4.0.0</modelVersion>

 <groupId>sample</groupId>
 <artifactId>HttpPost</artifactId>
 <version>0.0.1-SNAPSHOT</version>
 <packaging>jar</packaging>

 <name>HttpPost</name>
 <url>http://maven.apache.org</url>

 <properties>
  <project.build.sourceEncoding>UTF-8</project.build.sourceEncoding>
 </properties>

 <dependencies>
  <dependency>
   <groupId>junit</groupId>
   <artifactId>junit</artifactId>
   <version>3.8.1</version>
   <scope>test</scope>
  </dependency>
  <!-- https://mvnrepository.com/artifact/commons-io/commons-io -->
  <dependency>
   <groupId>commons-io</groupId>
   <artifactId>commons-io</artifactId>
   <version>2.5</version>
  </dependency>
 </dependencies>
</project>
【Java】File Downloadその2(commons-io)
FileUtils.copyURLToFile(new URL("http://google.com/"), new File("/tmp/google.htm"));
1行ですむが文字コードが指定できない。保存したファイルをブラウザで開くとサイトによっては文字化けする。何故だ…
ちょっとしたものは上記で良いが、apache httpclientを推奨。apache httpclientはアクセス先がページ移動(301)したとき等に自動で移動してくれる。
◆ソースコード
package sample.httpget;

import java.io.File;
import java.io.IOException;
import java.net.URL;

import org.apache.commons.io.FileUtils;

public class App {
 public static void main(String[] args) {
  try {
   download("http://google.com/", "/tmp/google.htm");
  } catch (IOException e) {
   e.printStackTrace();
  }
 }

 public static void download(String targetUrl, String filePath) throws IOException {
  FileUtils.copyURLToFile(new URL(targetUrl), new File(filePath)); // 文字コードが設定できないのでサイトによっては文字化けする?
 }
}
◆pom.xml
<project xmlns="http://maven.apache.org/POM/4.0.0" xmlns:xsi="http://www.w3.org/2001/XMLSchema-instance"
 xsi:schemaLocation="http://maven.apache.org/POM/4.0.0 http://maven.apache.org/xsd/maven-4.0.0.xsd">
 <modelVersion>4.0.0</modelVersion>

 <groupId>sample</groupId>
 <artifactId>HttpGet</artifactId>
 <version>0.0.1-SNAPSHOT</version>
 <packaging>jar</packaging>

 <name>HttpGet</name>
 <url>http://maven.apache.org</url>

 <properties>
  <project.build.sourceEncoding>UTF-8</project.build.sourceEncoding>
 </properties>

 <dependencies>
  <dependency>
   <groupId>junit</groupId>
   <artifactId>junit</artifactId>
   <version>3.8.1</version>
   <scope>test</scope>
  </dependency>
  <!-- https://mvnrepository.com/artifact/commons-io/commons-io -->
  <dependency>
   <groupId>commons-io</groupId>
   <artifactId>commons-io</artifactId>
   <version>2.5</version>
  </dependency>

 </dependencies>
</project>
【Java】File Downloadその1(commons-io)
IOUtils.toString(new URL("http://google.com/"), "Shift_JIS");ちょっとしたものは上記で良いが、apache httpclientを推奨。apache httpclientはアクセス先がページ移動(301)したとき等に自動で移動してくれる。
◆ソースコード
package sample.httpget;

import java.io.IOException;
import java.net.URL;

import org.apache.commons.io.IOUtils;

public class App {
  public static void main(String[] args) {
    try {
      System.out.println(download("http://google.com/", "Shift_JIS"));
    } catch (IOException e) {
      e.printStackTrace();
    }
  }

  public static String download(String targetUrl, String ch) throws IOException {
    return IOUtils.toString(new URL(targetUrl), ch);
  }
}
◆pom.xml
<project xmlns="http://maven.apache.org/POM/4.0.0" xmlns:xsi="http://www.w3.org/2001/XMLSchema-instance"
 xsi:schemaLocation="http://maven.apache.org/POM/4.0.0 http://maven.apache.org/xsd/maven-4.0.0.xsd">
 <modelVersion>4.0.0</modelVersion>

 <groupId>sample</groupId>
 <artifactId>HttpGet</artifactId>
 <version>0.0.1-SNAPSHOT</version>
 <packaging>jar</packaging>

 <name>HttpGet</name>
 <url>http://maven.apache.org</url>

 <properties>
  <project.build.sourceEncoding>UTF-8</project.build.sourceEncoding>
 </properties>

 <dependencies>
  <dependency>
   <groupId>junit</groupId>
   <artifactId>junit</artifactId>
   <version>3.8.1</version>
   <scope>test</scope>
  </dependency>
  <!-- https://mvnrepository.com/artifact/commons-io/commons-io -->
  <dependency>
   <groupId>commons-io</groupId>
   <artifactId>commons-io</artifactId>
   <version>2.5</version>
  </dependency>

 </dependencies>
</project>
2017年8月19日土曜日
【Java】ServletでFile download(nio)
Files.copyでiostreamが指定可能とのことなので、試してみる。ちなみにサーブレットコンテナはJetty。
◆ソース(必要に応じてtry-catchを入れること。でないとexception発生時にexceptionがブラウザに出てしまう。)
◆速度
◆結論
普通に使える。パット見メモリリークはないが、要確認。BufferedOutputStream,BufferedInputStreamの2つを利用した場合と比較したが、速度は同じ。
◆pom.xml
◆環境
◆ソース(必要に応じてtry-catchを入れること。でないとexception発生時にexceptionがブラウザに出てしまう。)
package sample.niocopy;

import java.io.BufferedOutputStream;
import java.nio.file.Files;
import java.nio.file.Path;
import java.nio.file.Paths;

import javax.servlet.http.HttpServlet;
import javax.servlet.http.HttpServletRequest;
import javax.servlet.http.HttpServletResponse;

import org.eclipse.jetty.server.Server;
import org.eclipse.jetty.servlet.ServletHandler;

public class MyServlet extends HttpServlet {
  public static void main(String[] args) throws Exception {
    ServletHandler handler = new ServletHandler();
    handler.addServletWithMapping(MyServlet.class, "/*");

    Server server = new Server(8090);
    server.setHandler(handler);
    server.start();
    server.join();
  }

  @Override
  public void doGet(HttpServletRequest req, HttpServletResponse res) {
    try {
      Path uri = Paths.get("c:/tmp" + req.getRequestURI());

      if (Files.notExists(uri) || Files.isDirectory(uri)) {
        res.setStatus(404);
      } else {
        res.setContentType("application/octet-stream");
        res.setContentType("text/html; charset=UTF-8");
        res.setHeader("Content-Disposition", String.format("attachment; filename=\"%s\"", uri.getFileName()));
        try (BufferedOutputStream bos = new BufferedOutputStream(res.getOutputStream())) {
          Files.copy(uri, bos);
        }
      }
    } catch (Exception e) {
      e.printStackTrace();
    }
  }
}
◆速度
◆結論
普通に使える。パット見メモリリークはないが、要確認。BufferedOutputStream,BufferedInputStreamの2つを利用した場合と比較したが、速度は同じ。
◆pom.xml
<project xmlns="http://maven.apache.org/POM/4.0.0" xmlns:xsi="http://www.w3.org/2001/XMLSchema-instance"
 xsi:schemaLocation="http://maven.apache.org/POM/4.0.0 http://maven.apache.org/xsd/maven-4.0.0.xsd">
 <modelVersion>4.0.0</modelVersion>

 <groupId>sample</groupId>
 <artifactId>NioCopy</artifactId>
 <version>0.0.1-SNAPSHOT</version>
 <packaging>jar</packaging>

 <name>NioCopy</name>
 <url>http://maven.apache.org</url>

 <properties>
  <project.build.sourceEncoding>UTF-8</project.build.sourceEncoding>
  <jetty.version>9.3.6.v20151106</jetty.version>
 </properties>

 <dependencies>
  <dependency>
   <groupId>junit</groupId>
   <artifactId>junit</artifactId>
   <version>3.8.1</version>
   <scope>test</scope>
  </dependency>
  <dependency>
   <groupId>org.eclipse.jetty</groupId>
   <artifactId>jetty-server</artifactId>
   <version>${jetty.version}</version>
  </dependency>
  <dependency>
   <groupId>org.eclipse.jetty</groupId>
   <artifactId>jetty-webapp</artifactId>
   <version>${jetty.version}</version>
  </dependency>
 </dependencies>
</project>
- 速度確認した仮想マシン
- CPU core数:4
- メモリ:2.5GB
- OS:Windows10 Pro x64
- 仮想マシン:VMWare vShpere ESXi6.5
- Java:1.8
- ホストPCの性能(参考)
- CPU:Intel Core i5-4250U(2Core 2HT)
- メモリ:16GB
- ドライブ:SSD(ウルトラ II mSATA SSD SDMSATA-512G-G25C)
- 仮想マシン:VMWare ESXi6.5上の仮想マシン
2017年7月26日水曜日
【Java】【Spring Integration】Service Activatorで例外送出
Service Activatorで例外送出するとどうなるのか?
下記のsaServiceで例外を発生させる。
◆integration-graph
◆ファイル構成
ソースコードのvalはlombokを使用。
◆Main.java
public class Main {
  public static void main(String[] args) {
    try (val ctx = new ClassPathXmlApplicationContext("SpringIntegration.xml")) {
      val inCh = ctx.getBean("inCh", MessageChannel.class);
      val outCh = ctx.getBean("outCh", PollableChannel.class);

      inCh.send(MessageBuilder.withPayload("test").build());
      System.out.println(outCh.receive());

      System.in.read();
    } catch (Exception e) {
      e.printStackTrace();
    }
  }
}
◆SampleService
@Component
public class SampleService {
  @ServiceActivator
  public String Exec(String msg) throws IllegalArgumentException {
    throw new IllegalArgumentException("err");
  }
}
◆SpringIntegration.xml
◆log4j.xml
<?xml version="1.0" encoding="UTF-8"?>
<!DOCTYPE log4j:configuration SYSTEM "log4j.dtd">
<log4j:configuration
  xmlns:log4j='http://jakarta.apache.org/log4j/'>
  <appender name="STDOUT" class="org.apache.log4j.ConsoleAppender">
    <layout class="org.apache.log4j.PatternLayout">
      <param name="ConversionPattern" value="%d{yyyy-MM-dd HH:mm:ss} [%p] %m%n" />
    </layout>
  </appender>
  <root>
    <priority value="info" />
    <appender-ref ref="STDOUT" />
  </root>
</log4j:configuration>
◆実行結果
2017-07-26 01:43:34 [INFO] Refreshing org.springframework.context.support.ClassPathXmlApplicationContext@2e18f2: startup date [Wed Jul 26 01:43:34 JST 2017]; root of context hierarchy
2017-07-26 01:43:34 [INFO] Loading XML bean definitions from class path resource [SpringIntegration.xml]
2017-07-26 01:43:35 [INFO] Loading properties file from URL [jar:file:/C:/Users/root/.m2/repository/org/springframework/integration/spring-integration-core/4.1.4.RELEASE/spring-integration-core-4.1.4.RELEASE.jar!/META-INF/spring.integration.default.properties]
2017-07-26 01:43:35 [INFO] No bean named 'integrationHeaderChannelRegistry' has been explicitly defined. Therefore, a default DefaultHeaderChannelRegistry will be created.
2017-07-26 01:43:35 [INFO] No bean named 'errorChannel' has been explicitly defined. Therefore, a default PublishSubscribeChannel will be created.
2017-07-26 01:43:35 [INFO] No bean named 'taskScheduler' has been explicitly defined. Therefore, a default ThreadPoolTaskScheduler will be created.
2017-07-26 01:43:35 [INFO] JSR-330 'javax.inject.Inject' annotation found and supported for autowiring
2017-07-26 01:43:35 [INFO] Loading properties file from URL [jar:file:/C:/Users/root/.m2/repository/org/springframework/integration/spring-integration-core/4.1.4.RELEASE/spring-integration-core-4.1.4.RELEASE.jar!/META-INF/spring.integration.default.properties]
2017-07-26 01:43:35 [INFO] Initializing ExecutorService  'defaultSockJsTaskScheduler'
2017-07-26 01:43:35 [INFO] Initializing ExecutorService  'taskScheduler'
2017-07-26 01:43:36 [WARN] Neither 'urlMap' nor 'mappings' set on SimpleUrlHandlerMapping
2017-07-26 01:43:36 [INFO] Starting beans in phase -2147483648
2017-07-26 01:43:36 [INFO] Starting beans in phase 0
2017-07-26 01:43:36 [INFO] Adding {service-activator:saService} as a subscriber to the 'inCh' channel
2017-07-26 01:43:36 [INFO] Channel 'org.springframework.context.support.ClassPathXmlApplicationContext@2e18f2.inCh' has 1 subscriber(s).
2017-07-26 01:43:36 [INFO] started saService
2017-07-26 01:43:36 [INFO] Adding {logging-channel-adapter:_org.springframework.integration.errorLogger} as a subscriber to the 'errorChannel' channel
2017-07-26 01:43:36 [INFO] Channel 'org.springframework.context.support.ClassPathXmlApplicationContext@2e18f2.errorChannel' has 1 subscriber(s).
2017-07-26 01:43:36 [INFO] started _org.springframework.integration.errorLogger
2017年7月21日金曜日
【SQL Server】【Visual Studio】【C#】DBからC#コード更新(上書き)
◆メニュー
【SQL Server】開発環境構築(ER図作成にSSMSを使用)
◆手順
1.edmxファイルをダブルクリック。
【SQL Server】開発環境構築(ER図作成にSSMSを使用)
◆手順
1.edmxファイルをダブルクリック。
2.モデルブラウザの空白部分を右クリックし、[データベースからモデルを更新]
3.「完了」ボタンを押下。
4. 変更されたことを確認(下図では生年月日が増えた)し、Ctrl+Sで保存。
5.以下が表示された場合は、「すべてに適用」ボタン押下。
6.生成されたコードも生年月日が増えている。
2017年7月15日土曜日
【SQL Server】【Visaul Studio】DBからC#コード生成
◆メニュー
【SQL Server】開発環境構築(ER図作成にSSMSを使用)
◆概要
SSMSで作成したDBインスタンスからC#のエンティティクラスを生成する手順
◆環境
Visual Studio Pro以上(Community版は未調査。)
1. Winキー押下し、visを入力し、Enterキー押下。(環境によってはVisだけでは足りないので、入力文字を増やすこと)
2. [ファイル]-[新規作成]-[プロジェクト]を選択。
3. 適切なテンプレートを選択し、適切なプロジェクト名を設定し、OKボタン押下。
4. Ctrl+Shift+Bでビルドし、F5キーで実行まで確認しておく。
5. プロジェクトを右クリックし、[追加]-[新しい項目]を選択。
6. 「ADO.NET Entity Data Model」を選択、適切な名前を入力し、「追加」ボタン押下。
7. 「データベースからEF Designer」を選択し、「次へ」ボタン押下。
8. サーバ名・データベース名を入力し、「テスト接続」ボタン押下。サーバ名・DBインスタンス名は読み替えること。
9. 「OK」ボタン押下。
10. 「接続設定に名前を付けて App.Config」に保存をチェックし、「次へ」ボタン押下。
11. 「Entity Framework 6.x」を選択し、「次へ」ボタン押下。
12. データベースオブジェクトは全選択し、「完了」ボタン押下。下記ではビューが存在しないため、チェックしていないが、基本的には全てにチェックを入れる。(モデル名前空間はDbEmployeesModelのようにしたほうがいいかも。)
13. 「OK」ボタン押下。
14. ソリューションエクスプローラーにedmxが作成され、配下にテーブル名.csが生成ていることを確認。
15. MainWindows.xamlをダブルクリックし、ツールボックスからButtonをD&D。
16. フォーム上に配置したbuttonを選択し、プロパティパネルの⚡ボタンを押下し、Clickテキストボックスをダブルクリック。
17. コードが生成されることを確認。
18. 下記のようにDBアクセスのコードを入力し、ビルド&実行。
namespace WpfApplication1
{
    public partial class MainWindow : Window
    {
        public MainWindow()
        {
            InitializeComponent();
        }

        private void button_Click(object sender, RoutedEventArgs e)
        {
            using (var ctx = new DB_EMPLOYEESEntities())
            {
                using (var tran = ctx.Database.BeginTransaction())
                {
                    ctx.T_部署.Add(new T_部署() { 部署ID = 1, 部署名 = "開発1" });
                    ctx.T_社員.Add(new T_社員() { 社員ID = 1, 姓 = "名無し", 名 = "太郎", 所属部署ID = 1 });

                    ctx.SaveChanges();
                    tran.Commit();
                }

                var ret = (from shain in ctx.T_社員
                           join bu in ctx.T_部署
                             on shain.所属部署ID equals bu.部署ID
                         select new { shain, bu }).First();

                // Namespace==Systemは、外部参照などを表示しないようにプリミティブとstringのみにフィルタ
                // しっくりこないが…。
                Func<object, List<string>> trans = o =>
                    (  from ps in o.GetType().GetProperties()
                      where ps.PropertyType.Namespace == "System"
                     select ps.Name + ":" + ps.GetValue(o, null)).ToList();

                MessageBox.Show(
                    string.Join(",", trans(ret.bu   )) + Environment.NewLine +
                    string.Join(",", trans(ret.shain)));
            }
        }
    }
}
19. Buttonを押下。
20. selectの結果も正しい。

21. SSMSで確認しても、レコードが挿入されていることが確認できる。
登録:
コメント (Atom)
-
1.Ctrl+End。 2.Enter。※ 3.Ctrl+A。 4.Alt+A。 5.Alt+M。 ※手順1~2を抜かすと漏れるケースがあるので注意。手順1~2の詳細は後述。 また、手順2で改行が追加されるので注意。 ◆画像付き手順 以下のようなデータがある。...
-
◆メニュー 【SQL Server】開発環境構築(ER図作成にSSMSを使用) ◆DDL文をエクスポート(SQL Server Management Studio)手順 1. Winボタン押下&「SSMS」と入力し、Enter。 2. 認証方法を選択し、接続...
-
ASRなどのファイラを使えば、ファイル名一括置換機能があり、簡単に変換可能。しかし、フリーソフト禁止(ただし、テキストエディタは使用可能な場合)の職場では自分で一括置換するしかない。 エディタすらインストール禁止の場合は、Excelで行う。エディタもExcelも使えない場...


